The Position Details sidebar is your central hub for monitoring and managing liquidity positions. Access detailed information, harvest fees, deposit more liquidity, or withdraw—all in one place.Documentation Index
Fetch the complete documentation index at: https://docs.orca.so/llms.txt
Use this file to discover all available pages before exploring further.
Accessing the Sidebar
You can open the sidebar from two locations:Liquidity Terminal
From the My Positions pane when viewing any pool
Portfolio Page
From orca.so/portfolio
How to Open
- Click the Position
Click anywhere on your position row to open the sidebar.
Sidebar Tabs
The sidebar has three main tabs:Details
Details
The Details tab surfaces:
- Balance and Total PnL with percentage delta
- Pending Yield with a one-click Harvest Yield button
- Estimated Yield with a selectable timeframe (7D by default)
- Your Position — a liquidity histogram showing your range against the live price
- Current Price card with min/max range bounds
- Position Range — the exact tick boundaries
- Average Entry Price
- Harvested Yield — fees and rewards already collected on this position
- Position Duration — how long the position has been open
- Position Address — links to a block explorer
How to Harvest Yield
Learn about harvesting your earned fees
Deposit
Deposit
Add more liquidity to your existing position:
- Enter amounts for either token
- Auto-balancing calculates the other
- Use Max for quick deposits
- Enable Autoswap to balance tokens automatically
How to Add Liquidity
Step-by-step deposit guide
Withdraw
Withdraw
Remove liquidity from your position:
- Enter amounts or use the slider
- Partial or full withdrawal
- Option to keep position NFT when closing
- Fees harvested automatically
How to Withdraw Liquidity
Step-by-step withdrawal guide
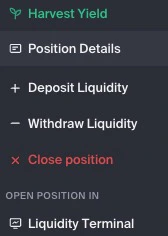
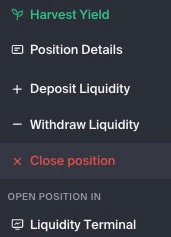
Quick Actions from the Menu
The ellipsis (…) menu provides quick access to common actions:| Action | What It Does |
|---|---|
| Harvest Yield | Collects pending fees and rewards on this position |
| Position Details | Opens the full sidebar (Details tab) |
| + Deposit Liquidity | Opens the sidebar’s Deposit tab |
| − Withdraw Liquidity | Opens the sidebar’s Withdraw tab |
| × Close position | Fully closes the position and burns the NFT |
| Open Position In → Liquidity Terminal | Switches to the Liquidity Terminal for this pool with the position pre-selected |
Tips for Using the Sidebar
Check status before harvesting
Check status before harvesting
If your position is out of range, consider whether to wait for price to return or close and reposition.
Use Autoswap for deposits
Use Autoswap for deposits
When depositing, if you don’t have the right token ratio, Autoswap can balance your tokens automatically.
Keep the NFT when testing
Keep the NFT when testing
If you’re experimenting with positions, keep the NFT when closing so you can redeposit to the same range later.
Related Guides
Portfolio Management
Overview of managing all your positions
Position Alerts
Set up notifications for your positions
Harvest Yield
Collect your earned fees
Close Position
Fully exit a position